Unity3D 自定义窗口的实现。
自定义窗口
Unity3D 可以通过编写代码,扩展编辑器的菜单栏和窗口。
简单的功能可以直接一个菜单按钮实现,复杂的功能就需要绘制一个窗口展示更多的信息。
编辑器扩展的脚本,需要放在 Editor 文件夹中。
菜单栏
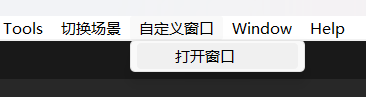
首先,需要引用命名空间 UnityEditor,然后在类里编写静态方法,在方法的头顶上面添加 MenuItem,填写菜单栏的路径。
1
2
3
4
5
6
7
8
9
10
| using UnityEditor;
public class CustomizeWindow
{
[MenuItem("自定义窗口/打开窗口")]
public static void OpenWindow()
{
}
}
|
编译一下,就能看到多出了一个菜单栏选项。
窗口
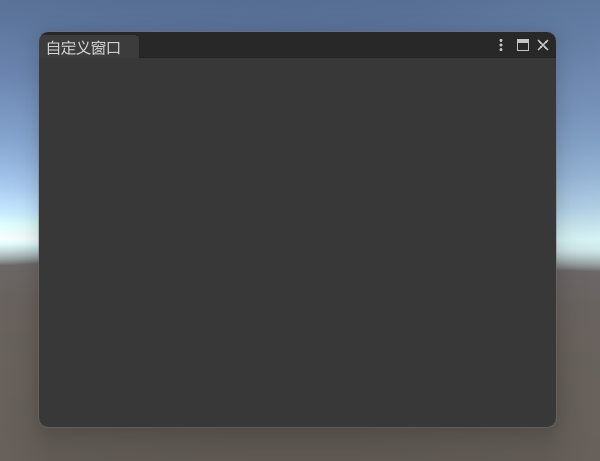
需要继承 EditorWindow,通过 GetWindow 方法创建一个窗口对象,调用 Show 方法显示。
可以通过修改 titleContent 设置窗口标题。
这里的 GUIContent 需要引用命名空间 UnityEngine。
1
2
3
4
5
6
7
8
9
10
11
12
13
14
15
16
17
18
| using UnityEngine;
using UnityEditor;
public class CustomizeWindow : EditorWindow
{
[MenuItem("自定义窗口/打开窗口")]
public static void OpenWindow()
{
CustomizeWindow window = GetWindow<CustomizeWindow>();
window.titleContent = new GUIContent("自定义窗口");
window.Show();
}
}
|
现在再去点击菜单栏的打开窗口按钮,就能显示自定义窗口了。
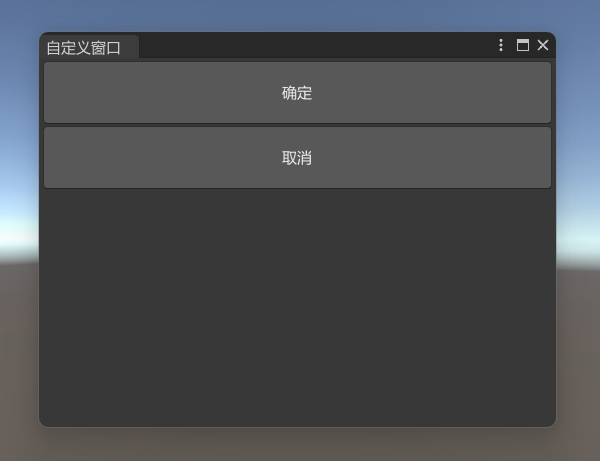
按钮
现在窗口空荡荡的,可以先加两个按钮。
在窗口中绘制 UI 元素,需要写在生命周期函数 OnGUI 里面,使用 GUILayout.Button 创建按钮,使用 GUILayout.Height 设置按钮高度。
创建按钮的代码之所以放在 if 语句的条件判断里,是因为点击按钮后会返回一个布尔值,可以判断按钮是否被点击。
1
2
3
4
5
6
7
8
9
10
11
12
13
14
15
16
17
18
19
20
| using UnityEngine;
using UnityEditor;
public class CustomizeWindow : EditorWindow
{
void OnGUI()
{
if (GUILayout.Button("确定", GUILayout.Height(50)))
{
}
if (GUILayout.Button("取消", GUILayout.Height(50)))
{
}
}
}
|
现在窗口就有了两个按钮了。
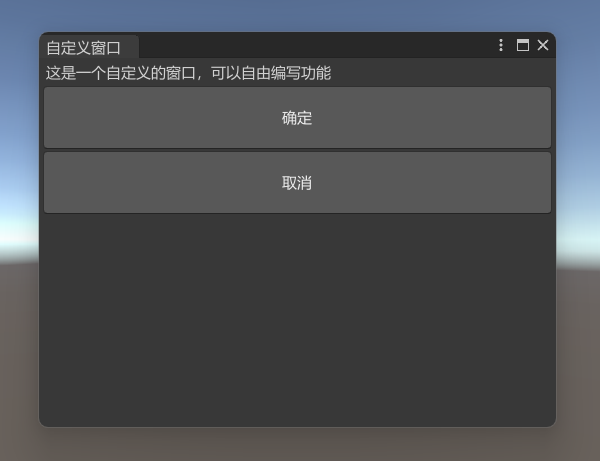
文本
使用 GUILayout.Label 绘制文本。
1
2
3
4
5
6
7
8
9
10
11
12
13
14
| using UnityEngine;
using UnityEditor;
public class CustomizeWindow : EditorWindow
{
void OnGUI()
{
GUILayout.Label("这是一个自定义的窗口,可以自由编写功能");
}
}
|
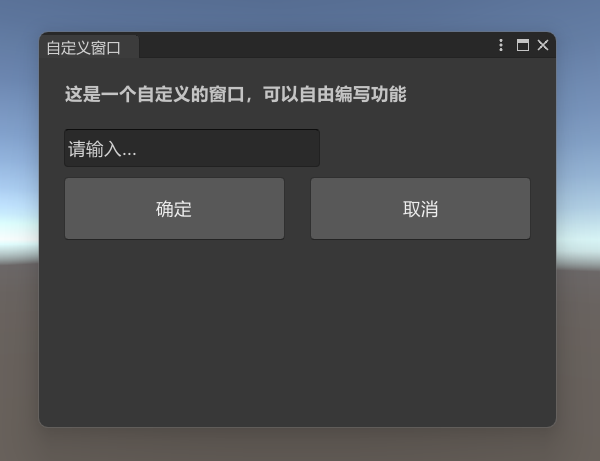
现在窗口有文本了。
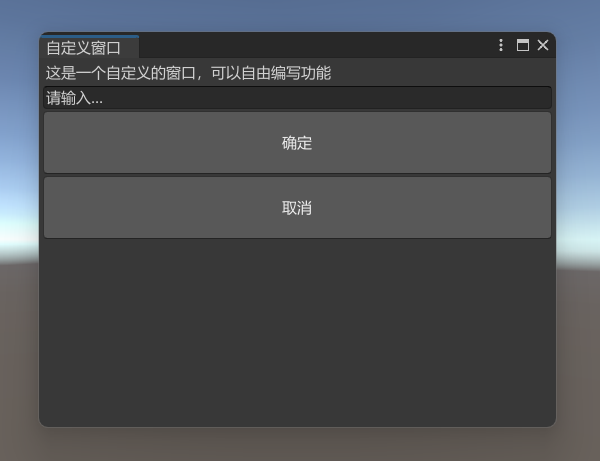
文本输入框
使用 EditorGUILayout.TextField 绘制文本输入框,它有返回值,是输入框的内容。
可以在按钮里面打印一下文本输入框的内容。
1
2
3
4
5
6
7
8
9
10
11
12
13
14
15
16
17
18
19
20
21
22
23
| using UnityEngine;
using UnityEditor;
public class CustomizeWindow : EditorWindow
{
string input = "请输入...";
void OnGUI()
{
input = EditorGUILayout.TextField(input);
if (GUILayout.Button("确定", GUILayout.Height(50)))
{
Debug.Log("input = " + input);
}
}
}
|
现在窗口有文本输入框了。
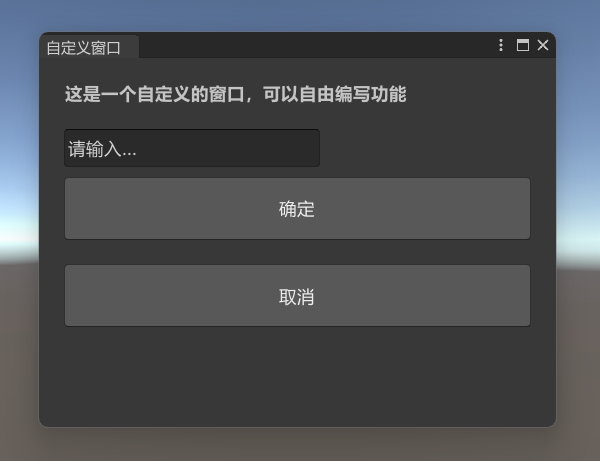
样式
按钮文本的样式也可以自定义。
先定义 GUIStyle 变量,在 InitGUIStyle 方法中,分别对三种控件的样式进行初始化设置,然后传递给控件的第二个参数。
1
2
3
4
5
6
7
8
9
10
11
12
13
14
15
16
17
18
19
20
21
22
23
24
25
26
27
28
29
30
31
32
33
34
35
36
37
38
39
40
41
42
43
44
45
46
47
48
49
50
51
52
53
54
55
56
57
58
59
60
61
62
63
64
| using UnityEngine;
using UnityEditor;
public class CustomizeWindow : EditorWindow
{
GUIStyle buttonStyle;
GUIStyle labelStyle;
GUIStyle textFieldStyle;
void OnGUI()
{
InitGUIStyle();
GUILayout.Label("这是一个自定义的窗口,可以自由编写功能", labelStyle);
input = EditorGUILayout.TextField(input, textFieldStyle);
if (GUILayout.Button("确定", buttonStyle, GUILayout.Height(50)))
{
Debug.Log("input = " + input);
}
if (GUILayout.Button("取消", buttonStyle, GUILayout.Height(50)))
{
}
}
void InitGUIStyle()
{
if (buttonStyle == null)
{
buttonStyle = new GUIStyle(GUI.skin.button);
buttonStyle.fontSize = 14;
buttonStyle.margin.left = 20;
buttonStyle.margin.right = 20;
buttonStyle.margin.top = 20;
buttonStyle.margin.bottom = 20;
}
if (labelStyle == null)
{
labelStyle = new GUIStyle(EditorStyles.boldLabel);
labelStyle.fontSize = 14;
labelStyle.margin.left = 20;
labelStyle.margin.right = 20;
labelStyle.margin.top = 20;
labelStyle.margin.bottom = 20;
}
if (textFieldStyle == null)
{
textFieldStyle = new GUIStyle(EditorStyles.toolbarTextField);
textFieldStyle.fontSize = 14;
textFieldStyle.fixedHeight = 30;
textFieldStyle.margin.left = 20;
textFieldStyle.margin.right = 20;
textFieldStyle.margin.top = 20;
textFieldStyle.margin.bottom = 20;
}
}
}
|
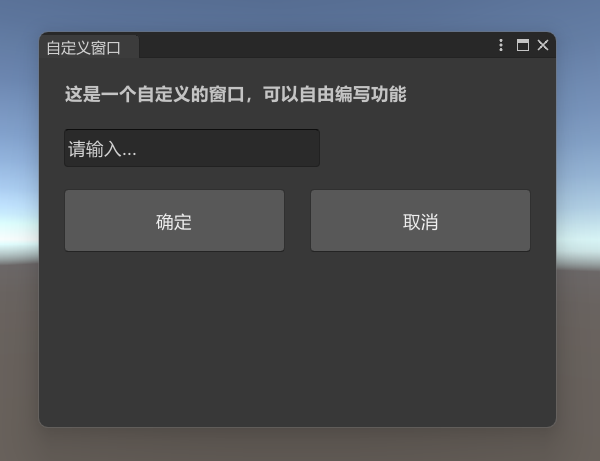
现在窗口焕然一新。
布局
窗口内的控件可以调整摆放的布局。
例如,把两个垂直摆放的按钮,改成水平布局。
- 在按钮代码的开头加上
EditorGUILayout.BeginHorizontal();
- 在按钮代码的结尾加上
EditorGUILayout.EndHorizontal();
被这两行代码包围的控件,就会处于同一个水平布局之中。
1
2
3
4
5
6
7
8
9
10
11
12
13
14
15
16
17
18
19
20
21
22
23
24
25
26
| using UnityEngine;
using UnityEditor;
public class CustomizeWindow : EditorWindow
{
void OnGUI()
{
EditorGUILayout.BeginHorizontal();
if (GUILayout.Button("确定", buttonStyle, GUILayout.Height(50)))
{
Debug.Log("input = " + input);
}
if (GUILayout.Button("取消", buttonStyle, GUILayout.Height(50)))
{
}
EditorGUILayout.EndHorizontal();
}
}
|
现在两个按钮就在同一个水平布局之中了。
间隔
使用 GUILayout.Space 绘制间隔。
例如,在文本输入框和按钮之间,加入 10 的间隔。
1
2
3
4
5
6
7
8
9
10
11
12
13
14
15
16
17
18
19
20
| using UnityEngine;
using UnityEditor;
public class CustomizeWindow : EditorWindow
{
void OnGUI()
{
input = EditorGUILayout.TextField(input, textFieldStyle);
GUILayout.Space(10);
EditorGUILayout.BeginHorizontal();
}
}
|
现在文本输入框和按钮之间就不会那么贴近了。
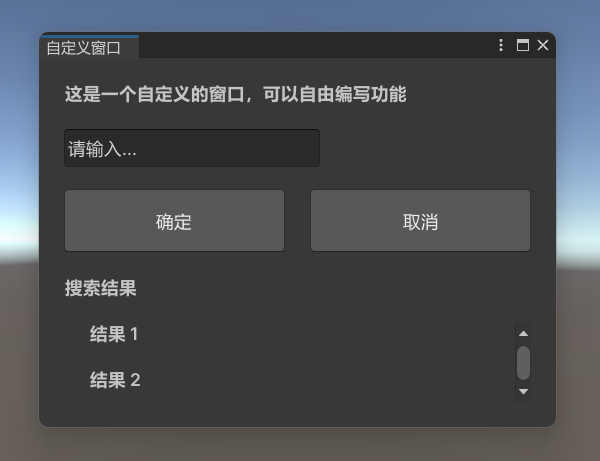
滚动视图
滚动视图也是两行代码包围控件。
EditorGUILayout.BeginScrollView(scrollPos);EditorGUILayout.EndScrollView();
不过滚动视图需要定义一个 Vector2 scrollPos,在滚动时记录当前的位置。
1
2
3
4
5
6
7
8
9
10
11
12
13
14
15
16
17
18
19
20
21
22
23
24
25
26
27
28
29
30
31
32
33
34
35
36
37
38
39
40
41
| using UnityEngine;
using UnityEditor;
public class CustomizeWindow : EditorWindow
{
GUIStyle scrollViewStyle;
Vector2 scrollPos = Vector2.zero;
void OnGUI()
{
GUILayout.Label("搜索结果", labelStyle);
scrollPos = EditorGUILayout.BeginScrollView(scrollPos, scrollViewStyle);
GUILayout.Label("结果 1", labelStyle);
GUILayout.Label("结果 2", labelStyle);
EditorGUILayout.EndScrollView();
}
void InitGUIStyle()
{
if (scrollViewStyle == null)
{
scrollViewStyle = new GUIStyle(GUI.skin.scrollView);
scrollViewStyle.fontSize = 14;
scrollViewStyle.margin.left = 20;
scrollViewStyle.margin.right = 20;
scrollViewStyle.margin.top = 20;
scrollViewStyle.margin.bottom = 20;
}
}
}
|
现在就有了一个展示结果列表的滚动视图。
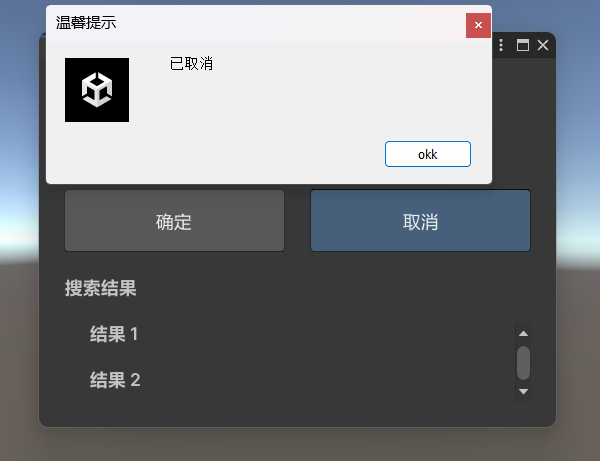
弹窗
现在点按钮是没有反馈的,通常情况下可以给一个弹窗提示。
- 弹窗附带一个确定和一个关闭按钮,使用
EditorUtility.DisplayDialog,返回 true 或者 false
- 弹窗附带一个确定、一个取消、一个可选和一个关闭按钮,使用
EditorUtility.DisplayDialogComplex,返回 0、1、2
例如,在确定和取消按钮中添加弹窗提示。
1
2
3
4
5
6
7
8
9
10
11
12
13
14
15
16
17
18
19
20
21
22
23
24
| using UnityEngine;
using UnityEditor;
public class CustomizeWindow : EditorWindow
{
void OnGUI()
{
if (GUILayout.Button("确定", buttonStyle, GUILayout.Height(50)))
{
int id = EditorUtility.DisplayDialogComplex("温馨提示", "搜索完成", "okk", "oh no", "good");
Debug.Log(id);
}
if (GUILayout.Button("取消", buttonStyle, GUILayout.Height(50)))
{
bool flag = EditorUtility.DisplayDialog("温馨提示", "已取消", "okk");
Debug.Log(flag);
}
}
}
|
现在点击确定按钮,弹出附带三个按钮和关闭按钮的弹窗。
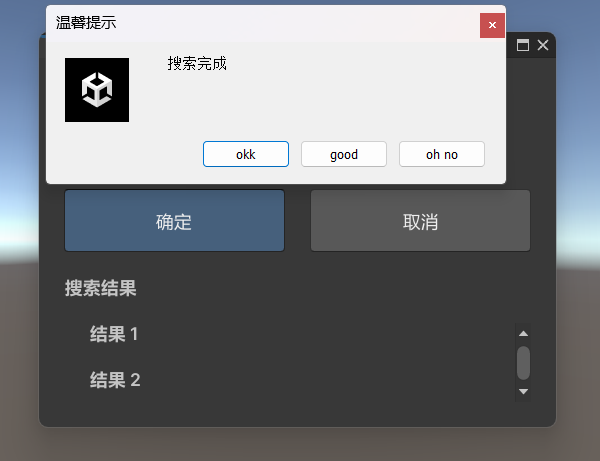
点击取消按钮,弹出附带一个按钮和关闭按钮的弹窗。